• Skip to primary navigation
  • Skip to main content
  • Skip to primary sidebar

Food and Journeys

International Recipes from Around the World

  • RECIPE CATEGORIES
  • WORLD CUISINES
  • HOW-TOS
  • ABOUT
    • About Me
    • Notes on Copyright
    • Privacy Policy
menu icon
go to homepage
  • Recipes
  • Cuisines
  • How-Tos
  • Guides
  • Subscribe!
  • About Me
  • Policy
  • Copyright
    • Facebook
    • Pinterest
    • YouTube
  • search icon
    Homepage link
    • Recipes
    • Cuisines
    • How-Tos
    • Guides
    • Subscribe!
    • About Me
    • Policy
    • Copyright
    • Facebook
    • Pinterest
    • YouTube
  • ×

    Home » Recipes » Rice & Other Grains

    Sinangag (Filipino Garlic Fried Rice)

    Published: May 4, 2020 · Modified: Nov 15, 2021 by Neriz

    Jump to Recipe

    A simple rice dish that is full of flavor — 
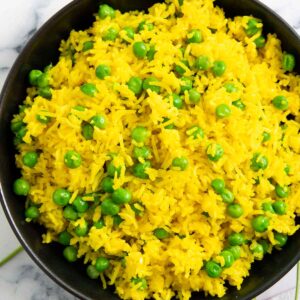
Sinangag (or Filipino Garlic Fried Rice) is excellent with fried or grilled meat and fish.  You think it’s just good for breakfast?  Nope, you can serve it any time of the day!

    An overhead shot of a plate of Filipino Fried Rice, garnished with crispy garlic and spring onions.

    (*This post contains some affiliate links)

    Do you want to know what’s a typical breakfast in the Philippines? It’s either pandesal or this, sinangag.

    Generally served with fried dried fish, cured meat (like tapsilog), or fried eggs, sinangag is now commonly enjoyed for lunch or early dinner.

    If you’re worried about the garlic in there, don’t be. It’s not an overpowering ingredient.  

    Yes, it’s fried rice with crispy garlic and garlic-infused oil, but they are subtle flavors.  

    So, give sinangag a try!

    IF YOU WANT MORE AUTHENTIC FILIPINO RECIPES, THEN YOU WOULD LOVE THESE POSTS!

    • Filipino Beef Tapa (Tapsilog)
    • Filipino Picadillo

    Ingredients

    An overhead shot of all the ingredients you need to prepare sinangag.
    • Oil – sunflower oil, canola oil, or any vegetable oil that’s got a neutral taste is excellent for sinangag. 

    Olive oil is not ideal because of its flavor.  Even the mildest ones will impart some flavor to the rice.

    • Garlic – minced or sliced finely.
    • Green onions – also known as scallions, chopped for garnishing your sinangag.
    • Cooked rice – definitely at least a day old because they have less moisture in them.
    • Seasoning – you only need salt and pepper for preparing this garlic fried rice recipe.

    Preparation

    Start your sinangag preparation by heating the oil in a large wok, skillet or aluminum pan.  Set the heat to medium-low.

    Add the garlic right away (photo 1).

    Latest version of first collage for step by step process to make sinangag.

    Spread the garlic evenly and continue cooking; adjust the heat to medium (photo 2).

    Mix frequently, and once the garlic turned into a darker, golden color (not burnt!), remove about a teaspoon for garnish later (photo 3).

    Add the rice and adjust heat to medium-high.

    Mix to combine.

    Latest second part of a collage showing step by step process to make garlic fried rice.

    Add salt plus pepper, and mix (photo 4).

    Continue cooking and frequently mixing your sinangag for about ten to twelve minutes.  You can adjust the seasoning during this time as well.

    Take the pan off the heat. 

    Transfer your sinangag into a plate and garnish with the remaining crispy garlic and chopped spring onions.

    Serve.

    A newly cooked Sinangag, prepared using a wok, garnished with crispy garlic, ready for serving.

    Helpful tips

    • Do not wait for the oil to become hot before adding the garlic.  

    It helps to cook it slowly; it also makes it easier not to burn the garlic this way.

    • Make sure that the cooked rice is dry, not sticky or clumpy. It’s the key to making great sinangag.  
    • Use your hands to separate the rice grains, sort of like squeezing them with your fingers; again, this can only work if the cooked rice is dry.
    • Taste and adjust seasoning before taking your sinangag off the heat. 
    A closer shot of a plate of Garlic Fried Rice, garnished with crispy garlic and spring onions.

    FAQs

    WHY IS LEFTOVER RICE BETTER FOR SINANGAG?

    Leftover rice is drier than just-cooked rice; hence, it will give you that perfect chewy-but-still-firm-fried-rice texture. 

    Newly cooked rice will generally result in soggy fried rice because there’s too much moisture in it.

    WHY IS THERE NO SOY SAUCE?

    Soy sauce is never used in sinangag.  

    Admittedly, some might like to add a small amount to give the fried rice some color — that’s fine, but that is not the traditional way.

    See how easy it is to prepare sinangag? You can even try pairing it with another delicious fried dish — Salt and Pepper Pork Belly

    So give this garlic fried rice a go this week, and let me know!

    Text for Roundup Sections
    • Traditional Filipino Food:  What You Need to Know
    • 20+ Easy Italian Desserts & Pastries Recipes
    An overhead shot of a plate of Filipino Fried Rice, garnished with crispy garlic and spring onions.

    Sinangag Recipe (Filipino Garlic Fried Rice Recipe)

    Sinangag! You can never be more traditional than this when it comes to Filipino cuisine. Otherwise known as 'Filipino Fried Rice,' you have minimal ingredients and you get maximum flavor in every serving. Try it for your next meal!
    5 from 1 vote
    Print Pin Rate
    Course: Side Dish
    Cuisine: Filipino
    Prep Time: 10 minutes
    Cook Time: 20 minutes
    Total Time: 30 minutes
    Servings: 5
    Calories: 231kcal
    Author: Neriz

    Equipment

    • Wok
    • Rubber Spatula
    • Pyrex Measuring Cups
    • Measuring Spoons
    • Garlic Press

    Ingredients

    • 5 cups rice, cooked & equivalent to 1 cup uncooked
    • 3 & 1/2 tbsp oil
    • 10 cloves garlic, minced
    • 3 tbsp spring onions, chopped & only light parts
    • salt and pepper, to season

    Instructions

    • Start making your sinangag by adding oil on a large wok or skillet; and setting the heat to medium-low.
    • Add garlic and spread evenly.  Adjust the heat to medium and continue cooking until garlic turns darker, regularly mixing to ensure that it does not get burnt.
    • Take about 1 teaspoon of the browned garlic and set aside for garnish later.
    • Add rice and adjust heat to medium-high.
    • Mix to coat the grains evenly with the oil.  Add salt and pepper.
    • Continue cooking your sinangag for about 10 to 12 minutes, intermittently mixing to cook it evenly.
    • Adjust the seasoning before taking the pan off the heat.
    • Transfer sinangag into a serving plate.  Top with the saved crispy garlic and chopped spring onions.
    • Serve.

    Notes

    • Cook’s Tip #1:  Use neutrally flavored vegetable oil like canola or sunflower.  They work better for sinangag than olive oil.
    • Cook’s Tip #2:  Use dry cooked rice, with separated grains. Clumpy or sticky ones will not work well for sinangag.
    • Cook’s Tip #3:  Add the garlic with the oil right away. It helps in not burning them, as well as infusing the oil longer with garlic flavor.
    • Cook’s Tip #4:  Do not forget to taste and adjust the seasoning before taking your sinangag off the heat. It helps to do this repeatedly since there is a lot of mixing involved.

    Nutrition

    Calories: 231kcal | Carbohydrates: 32g | Protein: 3g | Fat: 10g | Saturated Fat: 1g | Trans Fat: 1g | Sodium: 3mg | Potassium: 67mg | Fiber: 1g | Sugar: 1g | Vitamin A: 1IU | Vitamin C: 2mg | Calcium: 21mg | Iron: 1mg
    Tried this Recipe? Pin it for Later!Mention @foodandjourneys or tag #foodandjourneys!

    Reader Interactions

    Leave a Reply Cancel reply

    Your email address will not be published. Required fields are marked *

    Recipe Rating


    This site uses Akismet to reduce spam. Learn how your comment data is processed.

    Primary Sidebar

    Neriz

    Hej there!

    A smorgasbord of traditional and delicious international recipes awaits you, so feel free to look around and pick your favorites. No need to leave your kitchen to experience the real deal!

    Learn more about me →

    Image for listing as-featured-on

    For Your Sweet Tooth!

    Cover image for Traditional German Desserts and Recipes, showing a collage of German sweets and treats.
    A collage of images showing a variety of traditional Swedish desserts.
    A collage of images showing authentic Italian cookies.
    Feature image for post for Fika meaning and recipes, showing a collage of Swedish treats.

    Readers’ Favorite Cuisines

    Latest cover (May22) of Easy Spanish Recipes, showing a collage of traditional Spanish dishes.
    Cover image for Easy Thai Recipes, showing a collage of classic Thai dishes.
    Latest cover for Authentic Swedish Recipes Post showing a collage of classic Swedish dishes.
    Latest cover for Authentic German Recipes Post (Oct 2021), showing a collage of classic German dishes.
    Cover for Traditional Italian Regional Recipes, showing a collage of savory regional dishes.
    Jun2021, latest collage of images showing different traditional Portuguese dishes.

    Popular Posts

    Freshly baked Swedish almond cakes, on a cooling rack.

    Swedish Almond Cake (Mumma)

    Swedish Almond Tart

    Swedish Almond Tart

    A shot of a pan of Arroz de Tomate, fresh out of the stove, highlighting the sauce and the bits of tomatoes and parsley leaves.

    Portuguese Tomato Rice (Arroz de Tomate)

    An overhead shot of a basket of Biscotti Regina, served with coffee.

    Sicilian Sesame Seed Cookies (Biscotti Regina)

    An overhead shot of a freshly baked Italian Apple Cake, with powdered sugar and fresh apples on the side.

    Torta di Mele (Tuscan Apple Cake)

    An overhead shot of a bunch of freshly baked taralli, served with a shot of espresso, with scaterred fennel seeds on the background.

    Taralli (Italian Crackers)

    An image showing two bowls of Finnish Salmon Soup served with some bread.

    Finnish Salmon Soup (Lohikeitto)

    An overhead shot of three pieces of Italian breakfast pastries, served with espresso.

    Italian Cream Filled Pastry (Pasticciotto)

    Favorite Soups!

    Feature image for Roasted Eggplant Soup, showing it in a bowl, with some bread on the side.

    Turkish-Style Roasted Eggplant Soup

    A serving of Greek Chickpea Soup, with some kalamata olives on the side.

    Greek Chickpea Soup

    Two bowls of Portuguese Green Soup, with some raw kale on the countertop.

    Portuguese Green Soup (Caldo Verde)

    An overhead shot of a bowl of Lebanese Sour Lentil Soup, with slices of lemon on the side, and a bunch of fresh coriander.

    Lebanese Sour Lentil Soup (Adas Bhamod)

    An overhead shot of Creamy Celeriac Soup, garnished with dill, ready for serving.

    Turkish Celeriac Soup

    An overhead shot of a bowl of yellow pepper soup, garnished with croutons and fresh parsley.

    Yellow Pepper Soup

    An overhead shot of a pot of Minestrone alla Milanese, ready for serving, with carrots, basil and cheese on the side.

    Minestrone alla Milanese (Summer Minestrone)

    Two servings of German Potato Soup (Kartoffelsuppe). Both creamy potato soup servings are garnished with spring onions.

    German Potato Soup (Kartoffelsuppe)

    Two bowls of German Goulash Soup, ready for serving, with a slice of bread on the side.

    German Goulash Soup (Gulaschsuppe)

    An image showing two bowls of Finnish Salmon Soup served with some bread.

    Finnish Salmon Soup (Lohikeitto)

    Hearty Stews

    Feature image of Spanish Chorizo and Chickpea Stew, showing a serving of the dish, with slices of bread.

    Spanish Chorizo and Chickpea Stew

    Feature image for Lebanese Chicken Stew with Vegetables, showing a serving of the dish, with fresh lemon next to it.

    Lebanese Chicken Stew with Vegetables

    Feature image for Spanish Beef Stew, showing a serving of the dish, with bread on the side.

    Spanish Beef Stew (Easy Stovetop Recipe!)

    An overhead shot of a bowl of Swedish stew, with some boiled potatoes and pickled beets on the side.

    Swedish Beef Stew (Kalops)

    Overhead shot of a serving of Tuscan beef stew, served with toasted bread.

    Tuscan Beef Stew with Red Wine (Peposo)

    An image showing a serving of Ethiopian Spicy Pumpkin Stew, with the skillet on the back.

    Ethiopian Spicy Pumpkin Stew (Duba Wat)

    An overhead shot of a serving of authentic chicken cacciatore.; served with some bread.

    Easy Chicken Cacciatore

    Ossobuco

    Ossobuco

    Traditional Pasta Dishes

    Feature image for Gorgonzola Pasta with Peas, highlighting the creaminess of the sauce.

    Pasta with Gorgonzola Sauce & Peas

    Feature image for pasta alla sorrentina, highlighting the melted cheese on top.

    Pasta alla Sorrentina

    Feature image for Pasta alla Gricia, showing a serving of the dish, topped with grated pecorino and ground black pepper.

    Pasta alla Gricia (Guanciale Pasta)

    Feature image for bucatini all'Amatriciana, showing it served on a plate, with freshly grated pecorino Romano on top.

    Bucatini all’Amatriciana (Pasta with Guanciale and Tomatoes)

    Feature image for spaghetti alle vongole, showing the dish on a plate, for serving.

    Spaghetti alle Vongole (Pasta with Clams)

    Feature image for traditional pasta alla norma, showing the dish garnished with freshly grated ricotta salata.

    Traditional Pasta alla Norma (Sicilian Eggplant Pasta)

    Feature image for Pasta with Bell Peppers, showing the dish on a plate, garnished with parsley.

    Pasta with Bell Peppers

    Overhead shot of a bowl of Risoni Pasta Salad, garnished with more fresh basil.

    Risoni Salad

    Footer

    Policy

    • Privacy Policy

    Contact

    • About Me

    Copyright

    • Notes on Copyright

    A participant in the Amazon Associates Program, an affiliate advertising program designed to provide a means for sites to earn advertising fees by advertising and linking to Amazon.com. Copyright © 2022 · FOOD AND JOURNEYS