• Skip to primary navigation
  • Skip to main content
  • Skip to primary sidebar

Food and Journeys

International Recipes from Around the World

  • RECIPE CATEGORIES
  • WORLD CUISINES
  • HOW-TOS
  • ABOUT
    • About Me
    • Notes on Copyright
    • Privacy Policy
menu icon
go to homepage
  • Recipes
  • Cuisines
  • How-Tos
  • Guides
  • Subscribe!
  • About Me
  • Policy
  • Copyright
    • Facebook
    • Pinterest
    • YouTube
  • search icon
    Homepage link
    • Recipes
    • Cuisines
    • How-Tos
    • Guides
    • Subscribe!
    • About Me
    • Policy
    • Copyright
    • Facebook
    • Pinterest
    • YouTube
  • ×

    Home » Recipes » Bread

    Filipino Bread Rolls (Pandesal)

    Published: Mar 5, 2020 · Modified: Oct 1, 2021 by Neriz

    Jump to Recipe

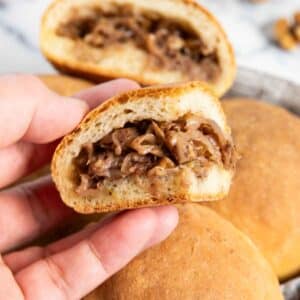
    Deliciously soft, these Filipino Bread Rolls (Pandesal) will surely become a regular in your home too! They’re so easy to make; the hard part is waiting for the proofing of the dough.  But trust me, it’s all worth it!

    A plate of pandesal, served with coffee on the background, ready for breakfast.

    (*This post contains some affiliate links)

    Aside from sinangag, these Filipino bread rolls are what locals generally have for breakfast.

    But it’s not really just for breakfast.  

    It’s common to hear ‘may pandesal dyan‘ (there are some bread rolls there) any time of the day.  Meaning, as long as they’re around, household members will always reach for a piece (or two) for lunch or merienda.

    I can’t really blame them.  Contrary to its name (pan de sal), these rolls are not salty. In fact, I think they’re quite sweet compared to other rolls that I’ve had here in Stockholm.

    Well, only one way for you to agree with me.  Try them now and let me know what you think in the comments section!

    IF YOU WANT MORE AUTHENTIC FILIPINO RECIPES, THEN YOU WILL LIKE THESE POSTS!

    • Filipino Beef Tapa (Tapsilog)
    • Filipino Picadillo

    Ingredients

    An image showing all the ingredients you need to prepare Filipino Bread Rolls at home.
    • Flour – you can use all-purpose flour; you will still have excellent results.  Adding bread flour will give it a chewier texture.
    • Vegetable oil – any oil that does not have a ‘taste’; that means no olive oil or peanut oil.
    An overhead shot of a tray of Filipino Bread Rolls, straight out of the oven.

    Preparation

    Start preparing your pandesal by mixing half a cup of warm milk with the yeast.  Set aside (photo1).

    Using a large bowl, combine all the flour, salt, and sugar.  Mix evenly (photo 2).

    Once the yeast mixture is ready, combine the remaining milk, eggs, yeast mixture, and vegetable oil in the stand mixer bowl (photo 3).

    Add half of the dry ingredients and mix using the stand mixer’s dough hook (photo 4).

    First part of a collage of images showing the step by step process on how to make pandesal.

    Add the remaining dry ingredients in batches.  Increase the speed of the mixer once a dough starts to form.  Keep mixing until you get a smooth dough; about 25 minutes. 

    Place dough into an oiled bowl, cover with a clean kitchen towel.

    Set dough aside until it has doubled in size (photo 5).

    Second part of a collage of images showing the step by step process on how to make Filipino Bread Rolls.

    Punch the air out of the dough and divide it into equal portions.  I generally make 25 pieces from this recipe (photo 6).

    Form each portion into a ball and roll-on breadcrumbs (photo 7).

    Last part of a collage of images showing the step by step process on how to make the traditional Filipino bread, pandesal.

    Place each roll on a baking tray lined with a baking sheet and keep some distance between each roll.  Cover with a clean kitchen towel and set aside for 30 minutes (photo 8).

    Fifteen minutes before you uncover the tray, preheat your oven to 180 C (350 F).

    The rolls will be quite puffy by this time, ready for baking (photo 9).

     Place the tray in the oven for about 20 minutes, or until the rolls have turned golden.

    A closer shot of newly baked pandesal, highlighting the browned breadcrumbs on top.

    Helpful tips

    • To mix with the yeast, make sure you only heat the milk to lukewarm. Don’t make it too hot, or worse, boiling temperature.
    • Beat the eggs before adding them to the rest of the liquid ingredients.
    • Use vegetable oil or any other neutral-tasting oil, NOT olive oil.
    • Mix the salt with the flour instead of adding it directly to the liquid ingredients (and the yeast mixture).
    • If the dough is too wet, do not hesitate to add more flour. Pandesal should have a pliable, slightly sticky dough, not a wet one.
    • If you want to keep all the rolls in equal size, use a weighing scale to measure each dough portion before forming it into a ball.
    A closer shot of a plate of pandesal, highlighting the soft texture inside the bread roll.

    FAQs

    CAN I LEAVE THE DOUGH OVERNIGHT?

    Absolutely.

    As soon as you have the dough in the oiled bowl, cover it with plastic and place it in the refrigerator.  The dough will still rise but at a slower rate.

    WHY IS MY PANDESAL SO HARD?

    This generally happens when the dough is dry.

    To avoid this scenario, you can either add the flour slowly (as I indicated in this recipe) or if you’ve already added all of them, add a bit more water to get the pliable dough that you need.

    HOW LONG WILL THEY LAST?

    When placed in an airtight container — maximum two days. You just need to reheat, and you’re good to go.

    If you still have a ton left after two days, not a problem; turn them into homemade breadcrumbs.

    CAN I FREEZE PANDESAL?

    Yep.

    Let them cool first, then arrange them in a freezer bag — I strongly suggest setting them straight in the bag instead of randomly placing them inside.

    Once you’re ready to serve them, place the bag in the refrigerator overnight to defrost, then reheat as normal in the morning.

    IF YOU WANT MORE ASIAN FOOD, THEN CHECK OUT THESE POSTS!

    • Bibingka (Filipino Coconut Rice Cake)
    • Salt and Pepper Pork Belly
    A bowl of freshly baked Pandesal, served with an espresso and a regular latter, ready to be enjoyed.

    Filipino Bread Rolls (Pandesal)

    An all-around bread that's good at any time of the day, Filipino Bread Rolls (Pandesal) are so easy to make at home. So soft, and delicious, you will make it a regular in your home too!
    No ratings yet
    Print Pin Rate
    Course: Bread
    Cuisine: Filipino
    Prep Time: 40 minutes
    Cook Time: 20 minutes
    2 hours
    Total Time: 3 hours
    Servings: 24
    Calories: 127kcal
    Author: Neriz

    Equipment

    • Stand Mixer
    • Mixing Bowls
    • Dough Cutter
    • Rectangular Baking Tray
    • Baking Paper

    Ingredients

    • 1 & 1/2 cups milk (divided into 1/2 & 1 cup)
    • 2 & 1/4 tsp active dry yeast
    • 2 tbsp vegetable oil
    • 2 tsp salt
    • 1/2 cup sugar
    • 2 cups all-purpose flour (plus 1/2 cup more for adding)
    • 2 cups bread flour
    • 2 large eggs
    • 1/3 cup breadcrumbs

    Instructions

    Preparing dough:

    • Warm-up ½ cup of milk and mix with the yeast.  Set aside until foamy.
    • In a large bowl, combine all the dry ingredients – all-purpose flour, bread flour, salt, and sugar.  Mix evenly.
    • Once the yeast mixture is ready, combine all the wet ingredients in the stand mixer bowl – 1 cup milk, eggs, yeast mixture, and vegetable oil.
    • Add half of the dry ingredients and mix (using the dough hook) of the stand mixer.  Set your stand mixer to low at this time, so you don't sprinkle the flour.
    • Add the rest of the dry ingredients in batches and continue mixing until a dough starts to form.  
    • Adjust the speed of the mixer into medium and continue kneading until the dough becomes smooth. It usually takes 20-25 minutes.  You can also do the kneading manually if you don't have a stand mixer.

    Proofing dough:

    • Place the smooth dough in an oiled bowl and cover with a clean kitchen towel.  Set aside until the size of the dough has doubled. It generally takes me no more than 2 hours.
    • Punch the dough in the middle and remove it from the bowl.  Divide it into 24 equal portions.
    • Form each portion into a ball and roll it in breadcrumbs.
    • Place each ball in a baking tray lined with a baking sheet.  Keep some distance between rolls to allow when they expand.  Cover with a clean kitchen towel and set aside for about 30 minutes.

    Baking pandesal:

    • Halfway during this proofing time, preheat your oven to 180°C (350°F).
    • The rolls are slightly puffy by this time.  Uncover the baking tray and place it in the oven for about 20 minutes or until the rolls turned golden.
    • Take out of the oven and serve.

    Notes

    • You can skip the bread flour and just use all-purpose flour instead.  The result would still be great.  The bread flour gives the rolls a chewier texture.
    • Make sure you are mixing lukewarm milk with the yeast, not hot or boiling — or you’ll end up killing the yeast.
    • Beat the eggs before mixing them with the rest of the liquid ingredients.
    • Do not use olive oil. Stick to vegetable oil or any other oil that has a neutral taste.
    • Do not add the salt directly to the wet ingredients; mix it with the flour instead.
    • Do not hesitate to add more flour (slowly) if the dough is too wet. The dough for Filipino bread rolls should be just slightly sticky, not wet.

    Nutrition

    Calories: 127kcal | Carbohydrates: 22g | Protein: 4g | Fat: 2g | Saturated Fat: 1g | Trans Fat: 1g | Cholesterol: 17mg | Sodium: 218mg | Potassium: 61mg | Fiber: 1g | Sugar: 5g | Vitamin A: 47IU | Vitamin C: 1mg | Calcium: 26mg | Iron: 1mg
    Tried this Recipe? Pin it for Later!Mention @foodandjourneys or tag #foodandjourneys!

    Reader Interactions

    Comments

    1. kaitlyn says

      October 25, 2020 at 5:44 pm

      Hello – How much sugar needs to be added? I don’t see the amount listed in the recipe but it’s referred to a few times.

      Thanks,
      Kaitlyn

      Reply
      • Neriz says

        October 27, 2020 at 6:32 pm

        Apologies Kaitlyn, half a cup of sugar. I have now updated the recipe card.

        Thanks so much for bringing it to my attention! 🙂

        Reply
    2. SC says

      May 24, 2021 at 8:18 pm

      Hi, I tried using this recipe but the dough was too wet. I had to add an additional 1 cup flour instead the half cup as suggested. And this has diminished the flavor a bit. Is it possible to use just 1 egg instead? Will that help?

      Thanks!
      SC

      Reply
      • Neriz says

        June 01, 2021 at 8:00 am

        Sorry to hear that. Can you let me know if you use a combo of bread flour and all-purpose flour, or just all-purpose flour?

        Reply

    Leave a Reply Cancel reply

    Your email address will not be published. Required fields are marked *

    Recipe Rating


    This site uses Akismet to reduce spam. Learn how your comment data is processed.

    Primary Sidebar

    Neriz

    Hej there!

    A smorgasbord of traditional and delicious international recipes awaits you, so feel free to look around and pick your favorites. No need to leave your kitchen to experience the real deal!

    Learn more about me →

    Image for listing as-featured-on

    For Your Sweet Tooth!

    Cover image for Traditional German Desserts and Recipes, showing a collage of German sweets and treats.
    A collage of images showing a variety of traditional Swedish desserts.
    A collage of images showing authentic Italian cookies.
    Feature image for post for Fika meaning and recipes, showing a collage of Swedish treats.

    Readers’ Favorite Cuisines

    Latest cover (May22) of Easy Spanish Recipes, showing a collage of traditional Spanish dishes.
    Cover image for Easy Thai Recipes, showing a collage of classic Thai dishes.
    Latest cover for Authentic Swedish Recipes Post showing a collage of classic Swedish dishes.
    Latest cover for Authentic German Recipes Post (Oct 2021), showing a collage of classic German dishes.
    Cover for Traditional Italian Regional Recipes, showing a collage of savory regional dishes.
    Jun2021, latest collage of images showing different traditional Portuguese dishes.

    Popular Posts

    Freshly baked Swedish almond cakes, on a cooling rack.

    Swedish Almond Cake (Mumma)

    Swedish Almond Tart

    Swedish Almond Tart

    A shot of a pan of Arroz de Tomate, fresh out of the stove, highlighting the sauce and the bits of tomatoes and parsley leaves.

    Portuguese Tomato Rice (Arroz de Tomate)

    An overhead shot of a basket of Biscotti Regina, served with coffee.

    Sicilian Sesame Seed Cookies (Biscotti Regina)

    An overhead shot of a freshly baked Italian Apple Cake, with powdered sugar and fresh apples on the side.

    Torta di Mele (Tuscan Apple Cake)

    An overhead shot of a bunch of freshly baked taralli, served with a shot of espresso, with scaterred fennel seeds on the background.

    Taralli (Italian Crackers)

    An image showing two bowls of Finnish Salmon Soup served with some bread.

    Finnish Salmon Soup (Lohikeitto)

    An overhead shot of three pieces of Italian breakfast pastries, served with espresso.

    Italian Cream Filled Pastry (Pasticciotto)

    Favorite Soups!

    Feature image for Roasted Eggplant Soup, showing it in a bowl, with some bread on the side.

    Turkish-Style Roasted Eggplant Soup

    A serving of Greek Chickpea Soup, with some kalamata olives on the side.

    Greek Chickpea Soup

    Two bowls of Portuguese Green Soup, with some raw kale on the countertop.

    Portuguese Green Soup (Caldo Verde)

    An overhead shot of a bowl of Lebanese Sour Lentil Soup, with slices of lemon on the side, and a bunch of fresh coriander.

    Lebanese Sour Lentil Soup (Adas Bhamod)

    An overhead shot of Creamy Celeriac Soup, garnished with dill, ready for serving.

    Turkish Celeriac Soup

    An overhead shot of a bowl of yellow pepper soup, garnished with croutons and fresh parsley.

    Yellow Pepper Soup

    An overhead shot of a pot of Minestrone alla Milanese, ready for serving, with carrots, basil and cheese on the side.

    Minestrone alla Milanese (Summer Minestrone)

    Two servings of German Potato Soup (Kartoffelsuppe). Both creamy potato soup servings are garnished with spring onions.

    German Potato Soup (Kartoffelsuppe)

    Two bowls of German Goulash Soup, ready for serving, with a slice of bread on the side.

    German Goulash Soup (Gulaschsuppe)

    An image showing two bowls of Finnish Salmon Soup served with some bread.

    Finnish Salmon Soup (Lohikeitto)

    Hearty Stews

    Feature image of Spanish Chorizo and Chickpea Stew, showing a serving of the dish, with slices of bread.

    Spanish Chorizo and Chickpea Stew

    Feature image for Lebanese Chicken Stew with Vegetables, showing a serving of the dish, with fresh lemon next to it.

    Lebanese Chicken Stew with Vegetables

    Feature image for Spanish Beef Stew, showing a serving of the dish, with bread on the side.

    Spanish Beef Stew (Easy Stovetop Recipe!)

    An overhead shot of a bowl of Swedish stew, with some boiled potatoes and pickled beets on the side.

    Swedish Beef Stew (Kalops)

    Overhead shot of a serving of Tuscan beef stew, served with toasted bread.

    Tuscan Beef Stew with Red Wine (Peposo)

    An image showing a serving of Ethiopian Spicy Pumpkin Stew, with the skillet on the back.

    Ethiopian Spicy Pumpkin Stew (Duba Wat)

    An overhead shot of a serving of authentic chicken cacciatore.; served with some bread.

    Easy Chicken Cacciatore

    Ossobuco

    Ossobuco

    Traditional Pasta Dishes

    Feature image for Gorgonzola Pasta with Peas, highlighting the creaminess of the sauce.

    Pasta with Gorgonzola Sauce & Peas

    Feature image for pasta alla sorrentina, highlighting the melted cheese on top.

    Pasta alla Sorrentina

    Feature image for Pasta alla Gricia, showing a serving of the dish, topped with grated pecorino and ground black pepper.

    Pasta alla Gricia (Guanciale Pasta)

    Feature image for bucatini all'Amatriciana, showing it served on a plate, with freshly grated pecorino Romano on top.

    Bucatini all’Amatriciana (Pasta with Guanciale and Tomatoes)

    Feature image for spaghetti alle vongole, showing the dish on a plate, for serving.

    Spaghetti alle Vongole (Pasta with Clams)

    Feature image for traditional pasta alla norma, showing the dish garnished with freshly grated ricotta salata.

    Traditional Pasta alla Norma (Sicilian Eggplant Pasta)

    Feature image for Pasta with Bell Peppers, showing the dish on a plate, garnished with parsley.

    Pasta with Bell Peppers

    Overhead shot of a bowl of Risoni Pasta Salad, garnished with more fresh basil.

    Risoni Salad

    Footer

    Policy

    • Privacy Policy

    Contact

    • About Me

    Copyright

    • Notes on Copyright

    A participant in the Amazon Associates Program, an affiliate advertising program designed to provide a means for sites to earn advertising fees by advertising and linking to Amazon.com. Copyright © 2022 · FOOD AND JOURNEYS